

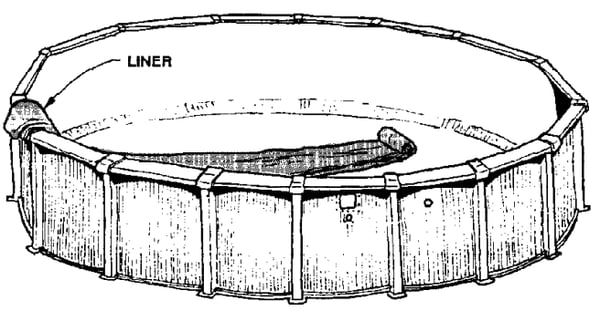
With proper maintenance and water care, most above ground swimming pool liners can last your family for upwards of 10 or more years. However, eventually your pool's old liner will need to be replaced.
However, on a nice warm day, this is a fairly easy project that can be done relatively quickly. So roll up your sleeves and let's tackle the details in this comprehensive DIY guide on how to replace your above ground swimming pool liner.
Ordering the Correct Replacement Liner
First things first, you'll want to get your new liner on order. Order early, even if it means you may have your liner weeks or months before you plan to install it. Better to store it than lose out on those warm Summer days waiting in a virtual line for inventory to be replenished. On top of giving your pool a fresh new look, this is also an ideal time to make any improvements to your pool's foundation or accessories. If you've been considering adding that fresh new walk-in step or new color-changing lights, now's a good time to get those items on order as well.

LINER INSTALLATION TYPE
When deciding on your new liner, you'll need to ensure that you purchase one compatible with your above ground swimming pool. This means ordering a liner that is the same same, size, and if purchasing a beaded or uni-bead liner, the same wall height. Here are some basic details on each common liner type to help out, or you can read our more thorough guide on what to know when choosing an above ground liner here.
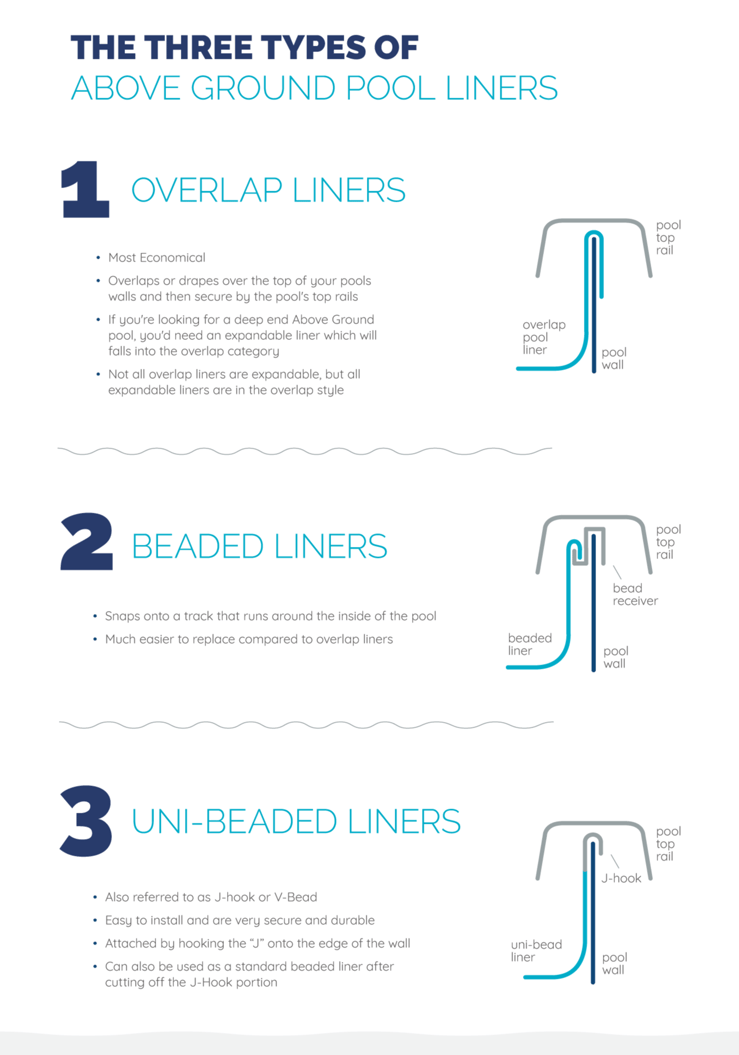
Overlap Liners
Overlap liners get their name from the fact that they overlap (hang over) the walls when installed. This type of liner is typically the most affordable depending on the brand and pattern you choose. While you won't have to worry about an exact wall height with this liner type, if you want to include a deep end in your above ground pool, it's only possible when an "expandable" overlap liner- all expandable liners are overlap liners but not all overlap liners are expandable. Any height over 54" is considered an expandable liner. You can read more on above ground pools with deep ends here.
Beaded Liners
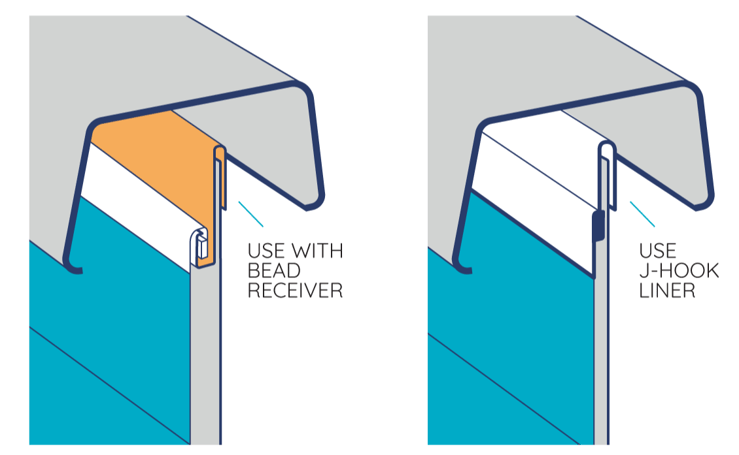
Beaded liners don't hang over the pool's walls. Instead, they are inserted into an additional required part called a bead receiver and secured in place using the pool's top rails running across the top of the pool's edge. Beaded liners are easy to install but are not compatible with deep-ended above-ground pools.
Uni-Beaded Liners
Uni-beaded liners are also called V-bead or J-hook liners. They are fitted with hooks that look like an inverted "J" at the edges. The hook rests on the pool's walls and is then secured into place using the pool's top rail.
Uni-beaded liners are easy to install because they just hook onto your pool's wall without any additional parts required. However, if you are replacing a beaded liner, uni-bead liners are designed to be able to be used as beaded liners by removing the hooks along the edges.
It's worth noting that if you change your liner's installation type, you may need additional supplies as well. For example, if you purchase a beaded liner you'll also need to purchase the proper amount of bead track needed to go around your pool to be able to install the new liner.
Keep in mind, if your liner simply has a small hole in from a toy or Fido going for a swim, you don't necessarily need an entirely new liner right away. You can, of course, get one on order in case you worry about the hole tearing more or the potentially long lead times but in the interim, you could use a repair kit on the damaged area.
LINER SIZE

Above ground pools come in standardized sizes, as do their liners. However, how your pool was actually installed can alter your measurements. Even the slightest variations between your pool and the new liner's size can greatly complicate the replacement process. For this reason, you'll want to measure the pool (at least once) for its exact size.
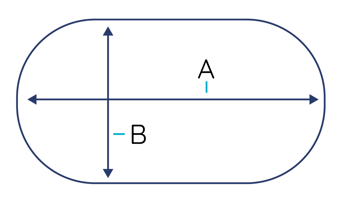
Use a tape measurer and from the inside of the pool measure from wall to wall across the center of your pool. Measure across the center of your pool at several points to avoid any discrepancies and ensure you're using the widest measurement.
You'll also need to measure the pool's wall height. This is done from the outside of the pool because the inside will have sand and/or filler along the bottom of the wall that would give you an incorrect measurement. Measure outside of the pool from the bottom pool track to the top pool track for your pool's true wall height. IMPORTANT: Do not include the pool's top rail in the wall height measurement.
Removing Your Old Liner
TOOLS
Besides the new liner, the following are tools can help make removing the pool's old liner and installing the new one easier or more efficient: 
- Measuring tape
- An extension cord
- A submersible pump
- Razor knife/Box cutter
- Flat towels
- Flat shovel
- Carpenter's level
- Commercial-grade vacuum
- Clothespins and pennies
- Duct tape
- Cardboard
- Lumber
- Coping clips
- Spray adhesive
- Wall foam
- Floor pad
- Floor cove
It is worth noting that the materials may vary depending on your pool's overall design.
Step 1: Drain the Water
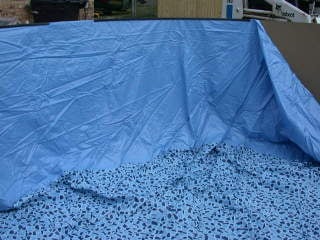
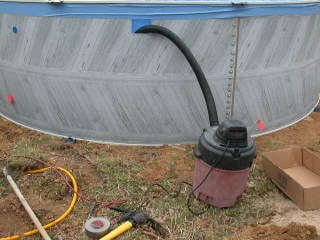
The water currently in your above ground pool is an obstacle and potential hazard. It can make the liner floor slippery, posing the risk of slip-and-fall accidents. It makes the liner difficult to handle during removal, further complicating your work.
.jpg?width=285&height=214&name=Image%20from%20iOS%20(43).jpg)
The drainage is a potential hazard if you let the water flood your above ground pool's foundation, making your pool's foundation unstable. It is advisable to divert the water away from the area directly around your pool. The most efficient way to do this is by using a long drain hose. Alternatively, you can create an artificial, temporary slope to make the water flow away from the pool to ensure your work area stays dry.
Therefore, the first step in properly draining as much water as possible can be accomplished in one of two ways:
- Siphon It Out using a water hose or submersible pump. Siphoning cannot get all of the water out so when you've gotten all that you can out, use your wet/dry vac to suck out the remaining water.
- Pump It Out using a rented submersible pump. The pump will drain more water than a mechanical siphoning hose, but not all of it. To get rid of the remaining water, use your wet/dry vac.
Step 2: Remove the Old Liner
As soon as all of the water is drained you can start removing the old liner. This will involve disconnecting all accessories that may be in the liner's way, including:
- Disconnecting the pool's plumbing from the skimmer(s)
- Unscrewing the faceplates and returns
- Removing any additional accessories such as ladders and steps
- Keep anything you remove in a safe place away from the construction so they do not get lost in the dirt, sand, or liner pieces heading for the trach.
 Since the liner will start to fall into the pool after you free it, you will want to slice the liner into small sections. This is so the fallen liner does not pull on the wall of your pool. No one wants to deal with pool walls that have caved in. Plus, the liner will be too big and heavy to easily or safely remove in one piece. You can use the razor knife to slice it into small pieces and remove them individually.
Overlap and uni-beaded liners are easy to remove as they only hang over the pool's walls. Here all you need to do is take off the top rail going around the top of your pool and remove the liner.
If you have a beaded liner or a liner connected to a bead track, you'll still need to remove the pool's top rail to access the bead track. Then remove the liner's edges from the bead track, do not remove the bead track from the pool. Remove the liner from the bead track.
Step 3: Prepare the Floor
The sand filler at the pool's bottom may be uneven after removing the old liner. You'll want to smooth it out by filling in any holes and spreading the sand out evenly. This is where you use the carpenter's level to check whether the filling is level. It is not advisable to add extra layers to the sand filler as it may complicate your earlier measurements.
If you were previously using a pool pad, you shouldn't need to do anything further to the floor of your pool.
Step 4: Prepare the Walls
Preparing the pool's walls involves doing the following:
- Covering all holes made by bolts and screws using duct tape.
- Lightly sand rusty areas to avoid corroding the new liner.
- Painting over rusty areas to reduce corrosion.
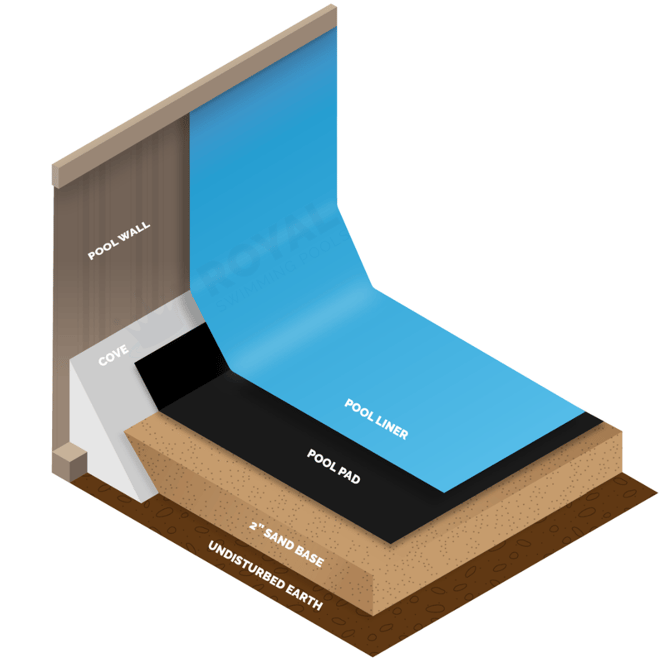
Perhaps the most important task is to smooth the mounds of undisturbed earth at the pool's edges. This earth cove functions as a resting bed for the liner and is integral to the pool's structure.
Alternatively, you can use foam cove designed for this particular purpose. Unlike sand and earth, foam coves do not give over time. Peel-and-stick foam coves are also super quick and easy to install.

If you were not using foam cove for your initial cove, you'll want to move all of the sand away from your walls (toward the center of the pool floor is easiest, before adding the cove. Then once the peel-n-stick cove is in place, smooth the sand back out evenly around the pool and up the foam cove so the entire floor is level. See the image below. If using a pool pad, your pool pad would now go on top of your 2" sand base and slightly up the foam cove. Again, see the image below.
Re-check the pool floor to make sure everything is level. Remove all stones and sharp objects to keep your liner from being punctured. Fill in any footprints and depressions with sifted earth and tamp level. If you have been using a ladder for access over the pool wall, remove it at this time and smooth any indentions it left.
Installing Your New Liner
Step 6: Install the New Liner
Before opening your liner box, check the label! Confirm that the liner is the proper size and pattern. If it is incorrect, DO NOT open the box. Contact your supplier immediately.
Install the liner on a warm, windless day. A warm liner is much easier to work with. The minimum temperature should be 65 degrees. If lower, try to warm the liner first by leaving in a heated room until ready to use.
Open your liner box carefully so the liner is not damaged. Do not use sharp objects to open the liner box.
The next installation steps are the same regardless of which liner type you have. As we cover more steps below, we'll break out where you'll see differences based on your liner type: Overlap, Beaded, or Unibead. However, there's a little different insight depending on if you have a round or an over-shaped pool.Start by identifying the floor seams in the liner.
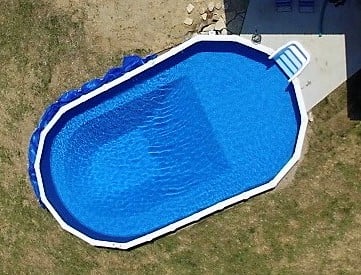
- OVAL POOLS: Oval liners typically have two seams that run the length of the pool. They are not in the center of the floor but each one is off-center to either side. Use these seams to help install the liner squarely within the pool.
Do not take apart the stabilizer rails at this time. Spread the liner around the pool evenly and (using the two-floor seams) try to center the floor in the oval shape of the pool as best as possible.
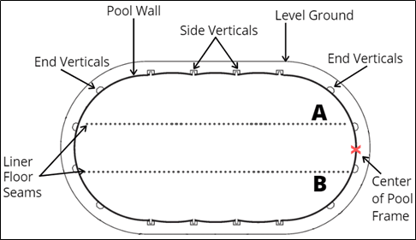
There are a few ways to line the floor seams up with the pool.
One way is to find and mark the center of your pool frame with an alligator clip or clothespin on each end. This will be the center on the rounded ends, not the straight sides. Then measure the distance between the two-floor seams. Then divide that measurement in half. EXAMPLE: if the distance between Floor Seam A and Floor Seam B is 5’ (or 60”), divide 5’ in half and you get 2.6’ (or 31.2”). Then measure 2.6’ from either floor seam (A or B) towards the center of the pool. This is the centerline of your oval liner. Measure that distance (2.6’, in our example) in towards the center of the pool in several places, and make sure the centerline of the liner is aligned with the center of your pool frame. *The numbers provided in the example above are for demonstration purposes only. You will have to take your own measurements as these distances vary from liner brands, types, and pool sizes.
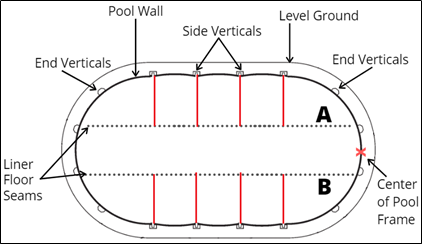
Another way is to use the uprights as guides however, this requires the uprights to already be vertically level for accuracy. Make sure the seams measure the same distance from the uprights.
The longer you spend centering the liner in the pool, the less chance you’ll have to take it down and rotate, essentially starting over. Once the liner is positioned where you want it, proceed below.
- ROUND POOL: Starting at the liner’s wall seam, place the liner on the top of the pool wall with the print side facing up and the flaps for the seams facing down. Again, do not put the wall seam over your skimmer or returns.
ALL POOLS REGARDLESS OF SHAPE:
- Hang the liner over the wall making sure that the seam is straight up and down, perpendicular to the floor. This will assure you that the liner begins going over the wall straight.
- The liner should have the loose end overhanging the outside of the pool by approximately 12”.
- Hold the loose end and unfold the liner down and across the middle of the pool.
- Spread the liner so that the seam going around the circumference of the pool base is resting on the cove evenly around the pool. See the diagram.
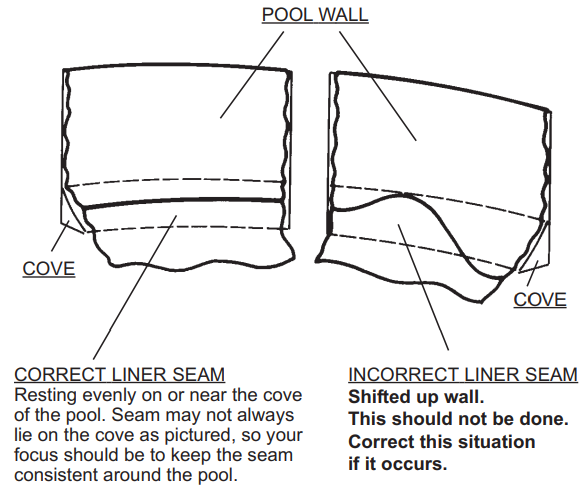
The seam should not be up on the wall, on the pool floor, or shifted to one side. These conditions will cause tightness or stretching of the liner when the pool is being filled.
PRO TIP: Liners are designed to be able to stretch, however, you want to do this mindfully and gently in order not to rip your liner in the process. Again, installing your liner on a warmer day will allow you to stretch the liner more easily.
As mentioned, there are three types of liners used for Above Ground Pools. Which liner type you have will determine HOW it is installed. You can click each of the following liner types to see each one detailed installation instructions.
Step 7: Set the Liner
Once the liner is securely in place by either the coping, bead or J-hook, temporarily pull any wrinkles in the floor towards the side wall evenly, leaving the wrinkles at the cove.
Remove wrinkles at the cove by adjusting the amount of material over the wall. Do not pull too tight- leave the slack on the sides. When a liner is properly installed, there is no downward pressure on the liner. The liner could pull in if it is hung too tightly.
When the liner is correctly positioned, there must be no air between the liner, the ground, or the pool wall.
PRO TIP: Use a Shop Vac to remove any space under the liner and show wrinkles.
USING A SHOP VAC
- Use cardboard and duct tape to seal the wall returns on the outside of the pool.
- Place the Shop Vac on a steady surface close to the skimmer.
- Insert the vacuum hose into the top of the skimmer and out through the skimmer’s opening into the pool until it’s roughly halfway down the pool’s wall.
- Make sure to use enough duct tape around the top of the skimmer to seal air from leaking around the hose.
Once the Shop Vac is on, you may see wrinkles on the walls and floor. When this happens, turn off the Shop Vac and carefully maneuver the liner to push/pull the wrinkle towards the nearest wall. If the wrinkles are difficult to reach, pushing the wrinkles with a pool brush can help smooth the liner out. Keep the hose in the pool until further instruction.
OVERLAP LINERS: For overlap liners with a lot of wrinkles, make sure the overlapped part of the liner is distributed evenly around the pool. If it is, try pulling more of the liner up and over the pool wall. Keep in mind that smaller wrinkles are often smoothed out by water pressure and a little guidance.
Add Your Stabilizer Rails/ Top Rails
When the liner is completely adjusted (and if an overlap liner, the plastic coping is secured), push the first stabilizer rail over the plastic coping or pool wall so that it fits snugly (starting at the wall bolts is usually a good idea).
PRO TIP: Leave one end of the stabilizer slightly raised so that the next stabilizer can interlock. Depending on your pool’s brand, you may have alternating stabilizer rail sizes.
As the stabilizers are installed progressively around the circumference of the pool, note that the tapered end of the stabilizer easily slides into the untapered end of the following stabilizer.
The tapered end should be inserted approximately 1" into the next stabilizer. This allows room for adjustment either in or out. In this way, the last stabilizer may be fitted into place by adjusting the other stabilizer rails as needed.
Step 8: Fill the Pool
DO NOT FILL YOUR POOL COMPLETELY. READ THROUGH THE REST OF THESE INSTRUCTIONS BEFORE STARTING.
Get any wrinkles you can’t live with worked out before filling the pool with water. Your pool will still hold water with wrinkles in the liner and you should not risk damage by draining the pool to remove wrinkles.
IMPORTANT! If you add water and the liner isn’t fitting right, you can face irreversible problems.
When you are 100% satisfied with the liner placement, you are ready for water.
If you plan to use a garden hose to add water to the pool, check the metal nozzle to make sure there are no sharp edges that could damage your liner. If so, file them down or cover them with duct tape prior to adding the hose to your pool.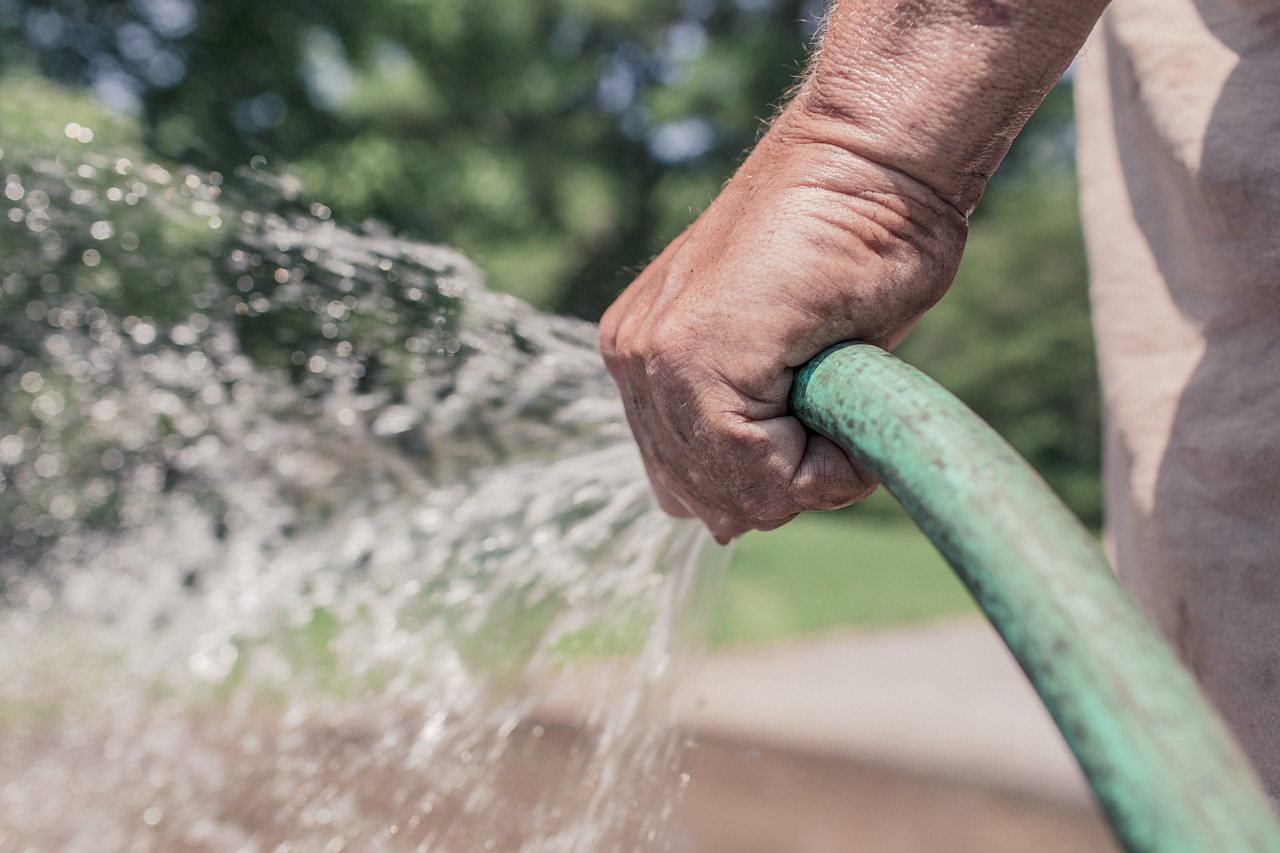
Start filling the pool with water (with the Shop Vac on if using one). When the water is no more than 1" deep, check if the pool is level. If water runs to one side, pull back the liner from the pool wall and make the ground level with sand or sifted earth.
Once level, continue to fill and adjust the liner as needed until you have about 6” of water in the pool so the liner is underweight and stretched to the proper position.
Keep the vacuum on until the water reaches just below the Shop Vac hose on the wall. Turn off the vac, take off any tape you added, and remove the Shop Vac hose. Continue filling the pool, stopping to adjust the liner if any wrinkles develop. You will want to adjust these as you go, as the liner cannot be shifted after the skimmer and return holes have been cut.
WARNING! Do not cut the skimmer and return holes in the liner until fully adjusted and the pool is 1/3 filled. Do not install faceplates, inlets, light fixtures, etc. until the water reaches 3” below the specific opening. Installing these items ahead of time may cause the liner to rip away from the opening as the water pulls down on the liner. We cover more on this topic in the next step.
If you are using a water truck or other fast water delivery system, you need to pay close attention to the pool walls while filling. Liners want to stretch slowly, so fast fills can cause problems if not monitored. Problems are uncommon but possible depending on how tight your liner is. Take care not to put a divot in the pool floor, which can occur when too much water force is aimed at the same area.
OVERLAP TIP: Overlap liners should be monitored to make sure they aren't being overstretched. Once you have about 6” inches of water in the pool, you can release any tension on the wall vinyl by removing and reinstalling the Coping Strips one at a time.
Step 9: Cutting the Skimmer and Return Holes from the Liner
Once your pool is about 1/3 of the way filled and you have adjusted the liner to remove any wrinkles. it's time to cut out your skimmer and vacuum cleaner port/return(s).

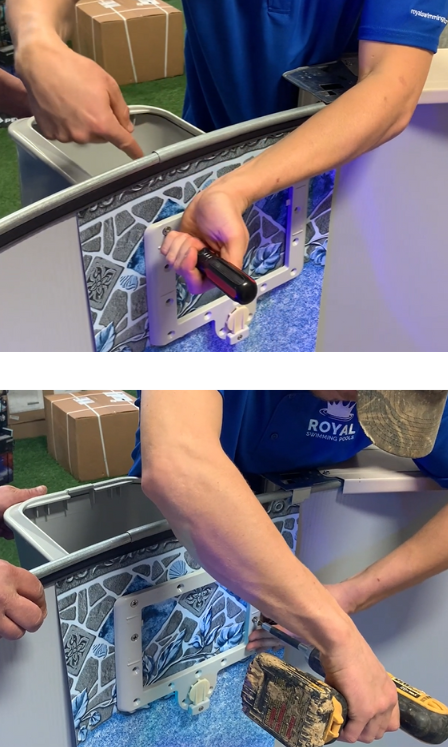
Prep the skimmer faceplate
Using your fingers on top of the liner, locate the two top corner holes of the skimmer gasket from the inside of the pool.
Pre-punch those two holes in the liner using the screws provided.
PRO TIP: Using a handheld screwdriver for this can be easier than just trying to push the screw through the liner by hand.
Once your first screw is through the liner, remove it and puncture the second hole, on the other top corner of the skimmer gasket.
Make sure to remove the screws from these holes before continuing.
Insert two screws into the upper two corners of the skimmer faceplate.
Line them up with the two holes you just pre-punched, and press the screws into the holes you made.
This will help keep the faceplate in place.
- Attach the skimmer to the wall
 If you removed the skimmer before installing your liner now is the time to reattach it. Have someone help you by holding the skimmer up to the outside of the pool wall and line up the top two corners with the ones on the pool wall.
Secure the top two corners of the skimmer to the pool wall using a handheld or cordless drill.
The skimmer should be secure enough on the wall so you can finish adding the rest of the screws yourself.
The screw holes should be lined up perfectly once your top two screws are secured.
PRO TIP: A good setting for your cordless drill (if using) is a 10, possibly an 11 if you're working on a colder cloudy day (the liner will not give as much when not warm).
Don't tighten any of the screws until all the screws are in place. Once all the screws have been added, go back and tighten each one.
- Cutting the liner
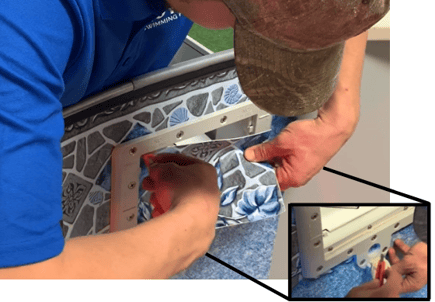
Next, you'll need to have a sharp razor blade or box cutter.
Carefully cut the liner out from the inside of the skimmer's faceplate.
Do the same for the inside of the vacuum cleaner port and any returns you have in your pool.
That's it! Add your ladder or step and the rest of your pool's accessories and you're ready to balance your water! You'll be swimming in no time!
Looking for more tips? Check out these other articles: