

Your skimmer performs a big job when it comes to keeping your swimming pool clean. Proper installation is a vital part of making sure it's capable of doing the best job possible.
We've compiled the entire process into 7 easy to follow steps. You can follow along the step in the video or see each step detailed out in the text below.
For this tutorial we are using a an Embassy Skimmer from H.I.I. manufacturer of Doughboy Pools.
STEP 1
Attach the Weir to the Skimmer
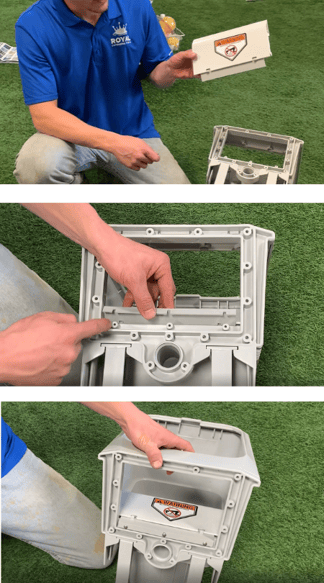 The weir is a flap that gets attached to your skimmer.
The weir rises and lowers to mirror the water level in the pool in order to let debris into the skimmer and then keep it there.
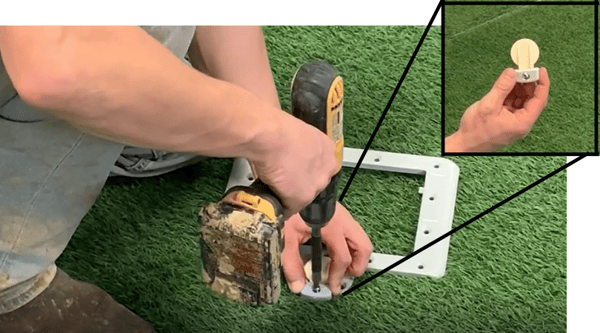
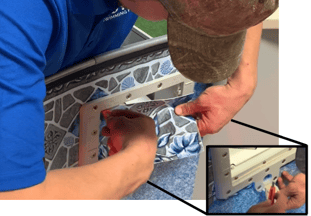
Locate The Simmer Weir and Hardware pack and find the 3 smallest screws. These will attach the weir onto your skimmer using a number 2 bit on your drill.
On the weir, there's going to be 3 slots on one end. You'll line those up with the 3 holes on the inside portion of the skimmer's frame.
The easiest way to do this is to insert the weir through the top opening of your skimmer and then line the weir slots up to the skimmer holes.
Start by putting the first screw in the middle hole and tighten it using a drill or screw driver.
Be cautious not to over tighten the screws as the skimmer and weir are plastic and can crack under too much pressure.
Add the reaming two screws.
STEP 2
Attach the Vacuum Port Cover to the Skimmer Faceplate
Locate the vacuum port cover and the 4th small screw from your hardware pack (also using a number 2 bit on a power drill).
Secure the vacuum port cover using this screw to the very bottom of the skimmer's faceplate.
(You'll notice the hole on the faceplate for this item is smaller than the rest.)
STEP 3
Attach Gaskets to the Pool Wall
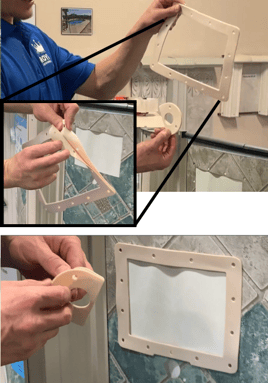
Locate the skimmer and vacuum port gaskets.
These items are designed for the pool wall to sit in between the flaps of the gasket to form a seal and prevent leaks around the skimmer and cleaner port.
When putting gaskets on the pool wall, work carefully as the edges of the wall are sharp.
After the skimmer gasket is on make sure all the holes on the gasket are lined up with the holes on the pool wall.
Next add your cleaner port gasket to the smaller hole in the pool wall just under your skimmer opening.
STEP 4
Prep the Skimmer Faceplate
 Using your fingers on top of the liner, locate the two top corner holes of the skimmer gasket from the inside of the pool.
Pre-punch those two holes in the liner using the screws provided.
PRO TIP: Using a handheld screw driver for this can be easier than just trying to push the screw through the liner by hand.
Once your first screw is through the liner, remove it and puncture the second hole, on the other top corner of the skimmer gasket.
Make sure to remove the screws from these holes before continuing.
Insert two screws into the upper two corners of the skimmer faceplate.
Line them up with the two holes you just pre-punched, and press the screws into the holes you made.
This will help keep the faceplate in place while you add the skimmer.
STEP 5
Attach the Skimmer to the Wall
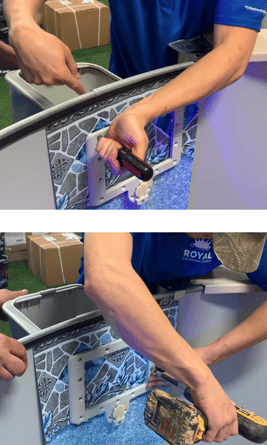 Have someone help you by holding the skimmer up to the outside of the pool wall and line up the top two corners with the ones on the pool wall.
Secure the top two corners of the skimmer to the pool wall using a hand held or cordless drill.
The skimmer should be secure enough on the wall so you can finish adding the rest of the screws yourself.
The screw holes should be lined up perfectly once your top two screws are secured.
PRO TIP: A good setting for your cordless drill (if using) is a 10, possibly an 11 if you're working on a colder cloudy day (the liner will not give as much when not warm).
Don't tighten the any of the screws until all the screws are in place. Once all the screws have been added, go back and tighten each one.
STEP 6
Cutting the Liner
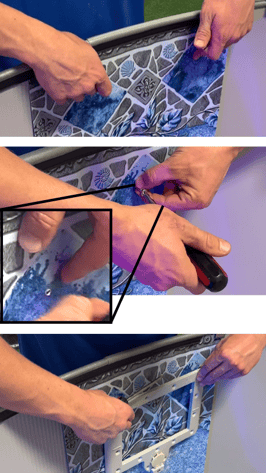
 Next, you'll need to have a sharp razor blade or box cutter.
Carefully cut the liner out from the inside of the skimmer's faceplate.
Do the same for the inside of the vacuum cleaner port.
STEP 7
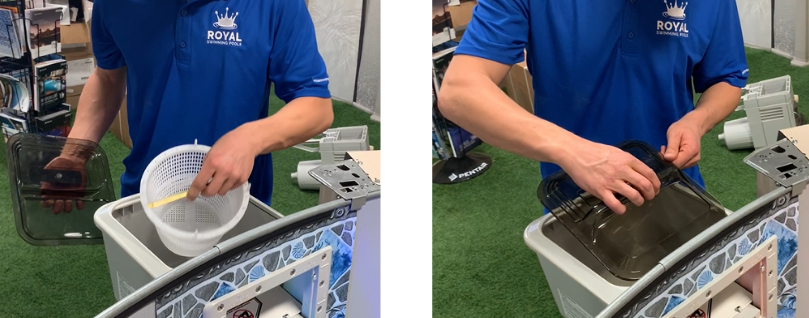
Adding the Skimmer Accessories
Add your skimmer basket into the skimmer and the lid to the top opening.
Your skimmer installation is now complete!
We hope this installation guide was helpful! For additional installation tips check out our resource center, learning hub or additional blog articles such as: