
Dig specs are the accurate drawings of your swimming pool plans, much like a blueprint. The Dig Spec has to be approved prior to moving forward with your swimming pool order in order to confirm that you are happy with the planned placement of everything in your pool kit. What you are looking for is and approving is:
- the size of the pool
- the location of the step
- light locations
The Dig Spec shows the final dimensions of your swimming as well as the panel layout. The panel layout is where each specific panel will be place to make up your pool.
It’s important that you are happy with the specifics of the Dig Spec when you approve it as your swimming pool liner will be made to fit the pool represented in the drawing.
It is for this reason that we will be covering what everything means on your Dig Spec to ensure you are approving exactly what you want in a swimming pool.
NOTE: If you ordered your inground pool from Royal Swimming pools, you will automatically be sent a dig spec/pool drawing via email before your pool is ordered. If you are looking for your Dig Spec, search your emails for "Document Approval" from Royal Swimming Pools. You can also find this in your Documents under your customer portal here.
IMPORTANT: This drawing is FINISH dimensions
![]() It does not include over dig for the deep end.
It does not include over dig for the deep end.
![]() It does not have over dig for bracing shown.
It does not have over dig for bracing shown.
![]() It does not allow for coping, deck height, or stones for the decking.
It does not allow for coping, deck height, or stones for the decking.
NOTE: If you are looking for digging instructions, how to carefully plan the exact location or elevation of your pool, or any of these above topics, please refer to page 9 of the inground installation guide found here.
HOW TO READ YOUR DIG SPEC
IMPORTANT: The example drawings provided in this article are generic and meant to assist you as a reference guide. These are not a reflection of your specific pool design. You should have received an email asking you to approve the attached drawing/dig spec for your specific pool. Please use that PDF and this guide together, as this guide is not specific to your design.
|
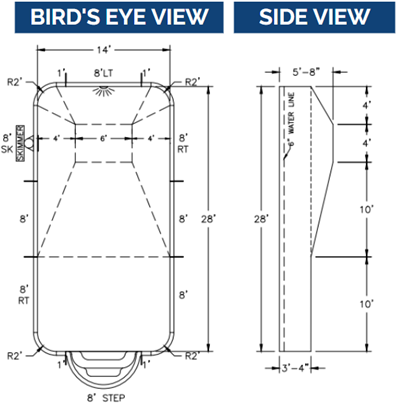
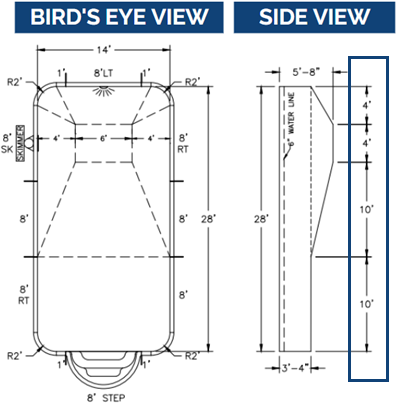
Your pool’s Dig Spec drawing shows both a bird’s eye view and a side view of your pool. The first thing to look closer at are the panel lengths. Panel lengths range from 6” (inches) to 8’ (feet). While we recommend sticking with the Dig Spec placements for laying out your panels, the panel can be placed in any order as long as the dimensions of that wall length add up to the same amount on your Dig Spec. (Here 14’ x 28’) EXAMPLE: if you want to reposition your skimmer panel that is 8' long with another 8' long panel, that is fine. If you change it with a 5' and 3', that’s okay too. All that matters is on that side of the pool the total length remains the same. In the image here that would be 28’. |
 |
DIG SPEC: MARKINGS
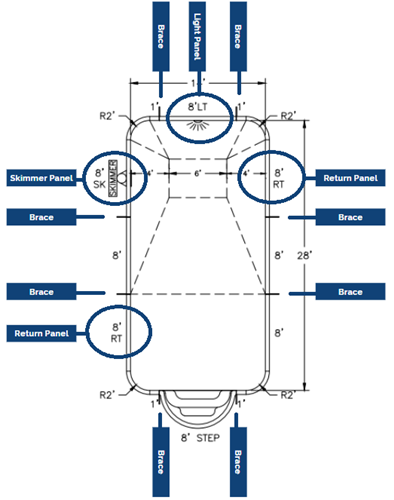
Let’s look to understand what the different markings on your Dig Spec mean.
 |
Skimmer panels are marked as “SK” and “SKIMMER”. The skimmer panel is the panel your skimmer will be in. For steel panels, this means that there is already a hole in that specific panel for your skimmer. For polymer pools, most skimmer panels come pre-cut out with the rare exception to certain panel layouts. In these exceptions, the skimmer cut out area is already pre-molded and easy to cut. IMPORTANT: The actual skimmer needs to be a minimum of 4 feet away from a corner. Installing a skimmer too close to a corner, especially corners with a 6" radius, can cause problems. |
 |
Return panels are marked as “RT”. Return panels are the panels your pool return inlets will be in. For steel panels, this means that there are already holes in those specific panels for your returns. For polymer pools, returns are not pre-cut but the installation manual covers how to easily cut this area out. |
 |
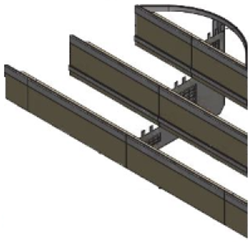
Pool Braces are marked as the small dark lines separating the panels. For freeform and polymer pool, you will typically have a brace at every wall joint (where each panel meets the next). On straight wall steel pool like rectangles and L-shapes, you will not have them connected to radius corners unless you ordered corner braces with your kit. Finally, your pool step will have a brace on each side of it no matter what. |
 |
Light location and panels are marked as “LT” and a light illustration. These only apply to lights that have a niche. The light panel is the panel your pool light will be in. For steel panels, this means that there is already a hole in that specific panel for your light. For polymer pools, most light panels come pre-cut out with the rare exception to certain panel layouts. In these exceptions, the light cut out area is already pre-molded and easy to cut. |
DIG SPEC: STEPS
Let’s talk about your step, which conveniently is marked on your Dig Spec as “STEP” usually along with the details on what the type of step it is. How you read your Dig Spec will differ slightly depending on the type of step you ordered. There are three types of steps to be aware of (regardless of entry step or deep end swim outs):
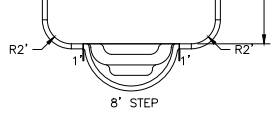 Outside the Perimeter Bolt On Step: As you can see, this step sits outside of the pool walls. You won’t have a wall panel in the area the step is going in. The step will attached to a wall panel on each side of it and have connecting braces on both sides.
 Inside the Perimeter Bolt On/Drop in Step: This step is much like the one above in that you won’t have a wall panel in the area the step is going in. The sides of the step will make up the perimeter area for this part of the pool and act at the pool walls. The step will attached to a wall panel on each side of it and have connecting braces on both sides.
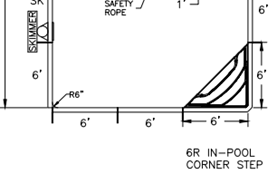
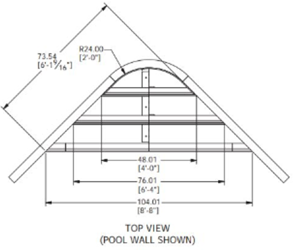
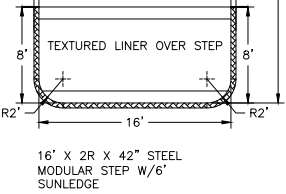 Vinyl Over Steps: Unlike the two step types shown above, you can see how the wall area around the step is marked differently. This is because when you have Vinyl Over Steps the step’s steel walls will equal your pool’s perimeter walls. Meaning you won’t have pool wall panels for this entire area. Instead your step will make up the perimeter of your pool. In the example to the left, the step will make up the entire 16’ end wall and 8’ on each side wall. This will be the case regardless of if your vinyl over steps are inside or outside the perimeter of the pool
*If you have a Drop In Vinyl Over Step your pool’s perimeter will be made up entirely of wall panels. Your step will not have walls of its own but instead will bolt onto your pool’s wall panels as shown here.
 IMPORTANT: If you have any step on the inside perimeter of your pool (vinyl over steps, corner steps, inside perimeter bolt on/drop in steps) you will not be able to change the location of your steps once the liner is made. This is due to your liner being specifically made to fit your pool configuration with your step(s) exactly where it is on your Dig Spec.
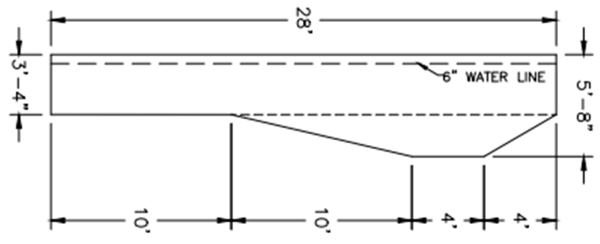
DIG SPEC: SIDE VIEW
Lastly, let’s go over what you need to be aware of looking at the side view!
The overall width and length is labeled on both the bird’s eye view and the side view.
The extra information you’ll find on the side view is the bottom finished dimensions which are shown on the far right hand side of your drawing.
On this example, bottom to top on your drawing when held upright (or left to right in the image at the bottom of this page) the shallow end is 10' long, main slope 10' long, hopper (deepest part of the pool) is 4' and back slope is 4'.
This will vary from pool to pool.
The shallow depth on the far left is 3'4"(standard finish depth for 42" wall pools) and the deep end is 5'8" to the top of the wall.
These dimensions are from the top of the wall, (NOT the top of the coping).
NOTE: When digging the pool, you do not over dig for the shallow end. The wall sits flat on the ground, and you add the 2" pool base up the wall 2". This means that you are filling the shallow end with 2" of floor material and essentially making the walls 2" shorter. The deep depth in the hopper is the only place you will over dig 2" to allow for the pool base. Refer to the installation manual for more in depth info on this subject
Thanks for reading! Let us know if you have questions in the comment section below! If you're a Royal Swimming Pools customer and you have questions pertaining to your specific Dig Spec, email your sales consultant or sales@royalswimmingpools.com
Can't get enough? Have you seen these?